How to Choose Marketing Automation Platform Providers Like a Pro in 2022

See the source image

Table of content

  • Features
  • Price
  • Scalability
  • Ease of Use
  • Integrations
  1. Features

The first and most important criterion, of course, is the kind of marketing automation features that a tool provides.

The most common application of automation in marketing is in the form of automated emails. This is one feature that almost all marketing automation software provides.

So, the key distinguishing factor becomes the level of automation within email campaigns for marketing that a tool can provide.

  1. Price

Given that most marketing automation platforms are mainly focused on email automation, their pricing depends on your contact list or the number of emails sent.

So, make sure that before you choose a marketing automation platform, you compare the prices keeping this in mind.

Don’t compare the plans in absolute terms, but in terms of how many contacts you can reach for a certain amount of money.

Also, look for marketing automation software vendors that provide customized pricing plans based on your exact needs.

This way, you can save a lot of money by not going for a plan that you don’t even need. You can simply pay for what you use and the features you need.

  1. Scalability

Adding to the previous point, you should opt for a tool that provides more scalability. You may think you should choose a small tool that meets your current needs, but it won’t be able to support you when your business grows.

This does not mean that you need to invest in premium, enterprise-level tools from the start.

But, make sure that you check whether the tool that you choose has enterprise plans or customized plans that you can move to later.

  1. Ease of Use

When someone hears “marketing automation,” they assume that it is something complicated and definitely not easy to use. However, that is not true.

In fact, ease-of-use should be one of the most important criteria for choosing a marketing automation platform.

There is no point in investing in something that you can’t use to the full capacity. Also, having a complex tool can be time-consuming and end up wasting your time.

When you choose a marketing automation platform, make sure that you choose one that has a clean and simple user interface that is easy to use.

Most marketing automation software solutions will claim to have that, but don’t just take their word for it.

  1. Integrations

Another important factor for choosing a marketing automation tool is the kind of integrations that it provides. Most automation tools focus on one or two aspects like email, sales, automation, advertising, etc.

So, to get the most out of such marketing automation software, you need to integrate it with your other tools and platforms.

Even with an all-in-one automation tool, you still need to integrate it with your customer relationship management (CRM) software solution, email marketing tool, etc.

Research the websites carefully to look for these details. Sometimes, you might have to go through the FAQs sections to find such information.

Also, once you have a basic understanding of what kind of customer support each platform offers, verify those claims by reading reviews by actual customers. But, more on that in the next section.
10 Content Marketing Platforms You Need to Know in 2022

See the source image

Content marketing platforms (CMPs) are digital tools that help creators generate awareness and interest, sales leads, and ultimately revenue from their online content. There are vast numbers of CMPs to choose from with software focusing on writing, graphics, paid promotion, partner promotion, keywords and SEO, content distribution platforms, and more.

  • SEMrush
  • HubSpot
  • Get Social
  • ScribbleLive
  • Curata
  • Brand24
  • Content Cal
  • Kapost
  • Ceros
  • Acrolinx
  1. SEMrush

SEMrush is one of the finest marketing platforms out there. Using it, you can discover new content ideas and can also find out the search volumes for the keyword. Once you’ve selected a topic, you can create a marketing plan and collaborate with your team. The tool also lets you track mentions, measure results, and helps you analyses and improve your content.

  1. HubSpot

HubSpot is an inbound marketing tool as well as a content platform that can help you with sales and CRM (customer relationship management).

It helps marketers create quality content, target customers, and manage their contact lists efficiently. It has a full-funnel marketing system that helps marketers build, administer, and distribute emails with the help of their marketing tools and applications.

  1. Get Social

This is one of the best tools for content distribution and content performance analytics. One key feature of this platform is that it tracks dark social media shares of your content, which is a metric that most other tools miss.

It also provides an automated content distribution solution that helps you effectively distribute content on social media. The tool also provides ROI tracking for each piece of content and helps you focus on high-performing content

  1. ScribbleLive

ScribbleLive’s data science technology helps users create quality content. It helps businesses manage the entire content life cycle from planning, creating, distributing content to measuring its impact. This makes it one of the best content marketing tools for optimizing your content strategy.

It is a SaaS platform that uses big data to help you improve campaign management, in-venue engagement, live events, content syndication, and more.

  1. Curata

Curata is a content curation software service. It helps you discover top content. And it learns your selections and serves better and more relevant content as time goes by. This content tool can conduct a content audit on demand.

It can analyse the impact of your content and sales pipeline. It can even help you to streamline your content production process and build a content supply chain

  1. Brand24

Brand24 is one of the most powerful online monitoring tools available today. It’s used by the likes of Uber, Intel, and Ogilvy, proof that it acts as an effective reputation management tool. Brand24’s feature set includes Mentions Feed, a place to track what people are saying about your brand online; Discussion Volume Chart, a graphical interpretation of discussions about your brand that could lead to positive or negative publicity; Alerts that show when there’s a spike in brand mentions, blog visits, or any other specific metric.

  1. Content Cal

Content Cal makes it quick and easy to manage your content marketing planning and processes. It is a multipurpose content marketing platform that allows you to plan, create, collaborate, publish and analyses your content. In addition, it has in-built approval flows to help streamline the process and avoid bottlenecks.

  1. Kapost

Kapost not only lets you manage your editorial processes from beginning to end, but will help you deliver the right content to the right person at the right time. It gives you the ability to create and update workflows easily and let team members give each other feedback directly in the tool during all creation stages.

The product has a content store of documents much like Google Docs/Drive where you can see the status of each asset, the next steps, the author and the submission deadline.

  1. Ceros

Ceros is an experiential content creation platform that enable marketers and designers to create interactive and immersive content experiences without traditional development or code. It’s more design and layout than it is a text-based content management system.

Using a cloud-based canvas, Ceros’ design studio lets users design beautiful digital content freely by dragging and dropping assets into the canvas and using its tools to create the design they want. The design canvas has a range of animation and interactive effects the you can apply to your content to bring your ideas to life.

  1. Acrolinx

Acrolinx is a CMP that uses Artificial Intelligence to learn the style and goals of your content to help you stay on-brand and on-message with every piece of content you create. As you create content, Acrolinx gives you real-time feedback based on what it’s learned. It helps you write more clearly, consistently, and in line with your brand.

Which is better: free or paid email marketing

See the source image

You have several options when it comes to marketing. In terms of digital marketing, social media has become a ‘get out of jail free card’ due to its reputation for reaching large audiences.

While social media has its advantages, conversions and engagement can be poor relative to reach. Email marketing, one of the oldest types of digital marketing, still works today, delivering high click-through rates.

  • What is email marketing?
  • No-cost marketing
  • Paid marketing
  • Understanding free vs paid email marketing services
    • Intimacy
    • Compatibility and integration
    • Usability
    • Logo and design
    • Cost


What is email marketing?

When trying to establish an email marketing campaign, you will be met with dozens of competitors. Before deciding on free vs paid, determine if you need an email service provider or a marketing solution.

An email service provider (ESP) lets you create and save templates for sending to lists of subscribers. This is probably what you envision when sending mass emails.

An email marketing service believes ‘I can do better than you’. It builds on top of ESPs’ robust foundations, adding layers of integration and automation. Costlier, it requires less human input and provides better personalized communications.

No-cost marketing

Many people starting out in email marketing may want a free account. It allows you to familiarize yourself with marketing tools and test them out to see what works best for your company.

Free accounts often have limited storage to urge you to subscribe, but it can frequently be plenty for small enterprises and non-profits.

The absence of commitment to a free marketing service provider allows business owners to try out numerous options before choosing on one. The cost of branding and eliminating watermarks from your email marketing will likely exceed the cost of testing.

Paid marketing

Services normally come in tiers, allowing business owners to pick a package that fits their needs and scale with them. One size fits all marketing is a warning sign when looking for a marketing agency.

A paid service often allows for more customisation, including branding and domain integration for sending from a company email address.

Understanding free vs paid email marketing services

Finding an email marketing business or email service provider can be difficult, especially for beginners. A successful marketing tool should have certain features, but finding the proper balance between power and cost can be difficult. When comparing free and paid marketing services, consider the following:

  1. Intimacy

When it comes to monetizing a business, you are the product if you can’t identify it. The corporation is likely profiting from you if you do not pay for a product. Sold to other parties, data such as demographics or usage patterns are usually involved.

With a premium service, you can expect privacy, but it’s good to know what data is being handled.

  1. Compatibility and integration

Pay for a service and expect basic tools. But if you fund it, you may see a return. As a business owner, you probably use a variety of systems to manage your company and collect analytics. The ability to link various systems will help reduce back-end clutter and confusion, lowering operational expenses.

  1. Usability

You may use a variety of devices to access your email marketing services, including laptops, tablets, and smartphones, if you’re on the road or have various locations.

Paid systems usually include hosting, though setting up your domain can be difficult for beginners, so having a support team might be useful.

  1. Logo and design

Sending plain text emails from a generic email account (like Gmail or iCloud) can look unprofessional and reduce conversions. Adding your company’s email address adds authenticity.

Consumers increasingly want emails to be as appealing as websites and social media pages, thus HTML is a must. Our HTML newsletter design guide explains certain design features to help you stand out.

Above all, your branding should be apparent through logos, slogans, fonts, and colors. Calls to action are crucial since they connect your email to the product or service you’re promoting. A paid marketing provider gives you more control over your newsletter design.

  1. Cost

Paying for a service is the most evident difference. Plan ahead of time for your company’s future. One provider may be cheap in year one, but pricing increases imply a ten-year plan may be much more expensive. A plan with a fixed price could save you money. Expect to upgrade tiers and subscriptions as you need more functionality.

Outlook PST Files: How to Encrypt Them

See the source image

This article explains what a PST file is and how to protect Outlook PST files with a password in Microsoft Outlook. Supported versions of Outlook include Outlook for Microsoft 365, Office 2019, Office 2016, Office 2013, and Office 2010.

  • Password-protecting an Outlook PST file
  • What is a Personal Storage Table (PST) file and how does it work?

Password-protecting an Outlook PST file

In order to add a password to an Outlook PST file, do the following steps:

  1. Open Microsoft Outlook.
  2. Alternatively, under the File menu, select Account Settings > Account Settings.
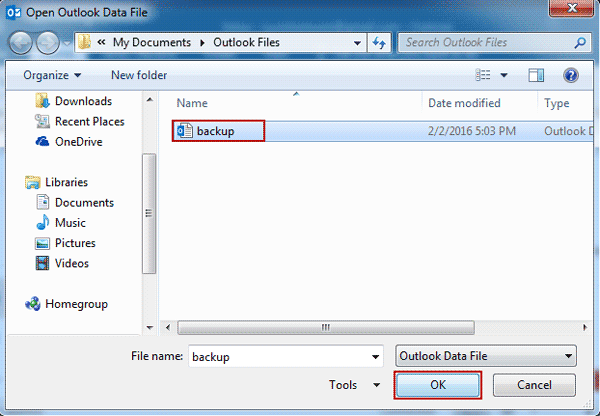
  3. Select the Data Files option from the drop-down menu.
  4. To set or adjust the password for an Outlook Data File (.pst), pick the file and then Settings from the drop-down menu.
  5. Select the Change Password option from the drop-down menu.
  6. In the New password and Verify password sections, type a password that is no longer than 15 characters in length.
  7. The newly created password will be saved when you click OK. You’ve successfully password-protected the PST file in your Outlook program.

What is a Personal Storage Table (PST) file and how does it work?

Outlook Data Files (.pst) are used by the Microsoft Outlook email program to store your messages and other Outlook files on your computer. Outlook Data Files are located in the Documents folder of your computer. PST files are a common abbreviation for several types of files.

Other users on a shared computer may be able to mistakenly change, delete, or gain access to these potentially sensitive data if the PST files are password-protected in Outlook, according to Microsoft.

How to Make Outlook Remember Your Email Password

See the source image

Each time you access your email in Microsoft Outlook, you will be prompted to enter your password into a password field. If you are the only one who has access to your computer, saving your password in Outlook is a good idea, despite the fact that it is quite secure.

In order to receive and send email without having to type your password in each time you start Outlook, you must configure it to remember your password. Also available is the ability to construct a complex password that you will not have to remember or retrieve from your password manager on a regular basis.

  1. Go to the File menu and select the File tab.
  2. Select the Info option.
  3. Select Account > Account Settings from the drop-down menu.
  4. In the Account Settings dialog box, pick the email address for which you want Outlook to remember the password and then select Change.
  5. In the More Settings dialog box for the Exchange Account Settings dialog box, select More Settings from the drop-down menu.
  6. In the Microsoft Exchange dialog box, navigate to the Security tab and uncheck the Always prompt for logon credentials checkbox.
  7. To save your changes, click Apply, and then OK to close the window.
  8. In the Exchange Account Settings dialog box, click on the Close button (X).
  9. In the Account Settings dialog box, click on the Close button.
  10. If required, close and reopen Outlook.

How to develop great sales leads

See the source image

The internet is chock full of tips and tricks to generate large quantities of B2B leads, but when it comes identifying which of the thousands are right for your product or service, actionable advice is harder to come by.

As you build your prospecting list, it’s natural to think you have to fill the top of your sales funnel with as many leads as possible in the hopes of closing a small number of sales at the bottom. But that’s not always the case. It’s more important to be strategic with how you generate sales leads instead of casting a wide net that does not go after the right prospects.

Save time, money and effort by identifying the right sales prospects, not chasing unsuitable leads who may not find your business relevant or affordable. Below are several solutions to building a quality list of leads through strategic planning and sales prospecting technology.

  • Nail down your ideal buyer persona
  • Draw in IBP leads with valuable content and offers
  • Use technology to generate leads and find accurate emails

Nail down your ideal buyer persona

Before you start looking for quality sales leads, you have to first understand your ideal buyer persona (IBP). A well-defined IBP is the foundation of every effective sales lead generation strategy. Identifying your IBP will help guide you to quality leads who need what you’re selling, have the budget to buy it, and are authorized to make purchasing decisions.

If you’re unsure of your IBP, use a data-driven approach to make it more precise:

  1. Start with your existing client network. Identify customers who closed on deals quickly, spent the most, made repeat purchases, or referred others to you.
  2. Once you have this list of top customers, identify what they have in common. Sort these customers by industry, revenue, location, business name, number of employees, and job title of the person who signed off on the deal.
  3. Use this information to develop a clearer understanding of your IBP. Then filter any incoming B2B leads that fit the profile of the buyer persona you need to target.

Draw in IBP leads with valuable content and offers

It’s not surprising that well-written content, such as social media posts, blogs, and whitepapers, can position your business higher in search results. If you know your IBP, you can leverage this content to offer a powerful lead magnet (something free that has value for potential customers) and generate new sales. For example, someone might find your blog post through a web search—at the end of the post, ask for their email in exchange for a promotional offer. It could be an e-book, an informational video, or anything that provides value and positions your product as the answer to their problem. Once they’re on your email list, you can proceed with a welcome email sequence and other offers. Email is still one of the most effective ways to reach people, as long as the emails you are using have been validated.

Use technology to generate leads and find accurate emails

Defining an IBP and producing good quality content takes time, so automating your lead generation strategy is paramount. There are different kinds of sales prospecting tools on the market that allow you to search for leads that specifically match your IBP’s demographics. It’s important to find a prospecting tool that not only identifies the right leads in your demographic, but also provides verified business contact information.

BizLeads, a cloud-based lead prospecting tool recently launched by American City Business Journals, stands out for two important reasons:

  1. It’s powered by ACBJ. American City Business Journals receive more self-reported data on U.S. businesses than any other prospecting tool on the market.
  2. It’s affordable. BizLeads subscription access can help you target leads on 30 million companies and 80 million business professionals all over the country to fit your IBP.
  3. It’s easy to use. With over 14 unique search filters, you can target a specific IBP using filters like job title search and seniority level to reach key-decision makers faster. Narrow down the right business contacts with pre-validated email addresses.

Unsubscribe From a Newsletter or Mailing List Using the Gmail Interface

See the source image

It will be demonstrated in this post how to unsubscribe from a Gmail newsletter or mailing list by utilizing the Gmail website. It also contains instructions on how to remove oneself from a mailing list or newsletter subscription.

  • How to Unsubscribe from Emails in Gmail Quickly and Easily
  • What You Should Keep in Mind When Unsubscribing from Email Newsletters

How to Unsubscribe from Emails in Gmail Quickly and Easily

Unsubscribing from mailing lists, newsletters, and other subscription-based communications is made simple with Gmail’s built-in shortcut. Gmail offers a convenient way to unsubscribe from emails by clicking on a link that immediately replies to the message with a cancellation notice. Due to the fact that some emails do not support this kind of unsubscription, Gmail automatically identifies the email sender’s unsubscribe link and directs you to a website where you can manually unsubscribe.

The following are the instructions for using the unsubscribe shortcut:

  1. Sign up for a mailing list or subscribe to a newsletter and send a message.
  2. To the right of the sender’s name or email address, select Unsubscribe from the drop-down menu. This can be seen at the very top of the message. On rare occasions, it will display the message Change preferences. The ability to customize how subscription emails are delivered is provided; however, most emails do not have this functionality.
  3. When the Unsubscribe message appears, select Unsubscribe from the dropdown menu.
  4. You may be needed to finish the unsubscribe procedure on the sender’s website in order to complete the process. If you do not, you will just receive a message from Gmail informing you that you have been unsubscribed from the service.

What You Should Keep in Mind When Unsubscribing from Email Newsletters

  • If the message contains a List-Unsubscribe: header, which specifies an email address or website to which the message should be forwarded, this method of unsubscribing will function only if the message includes the header.
  • If the automated de-registration does not work the first time, it may take several days for the sender or website to acknowledge the de-registration. And if this does not work the first time, wait several days before attempting it again.
  • Whether the Unsubscribe link does not appear in Gmail, look for an unsubscribe link or other information near the top or bottom of the message content to see if it is there.
  • If you are unsure whether a newsletter or mailing list is spam, do not use the Report spam feature to unsubscribe unless you are certain.

How to Exchange Instant Messages Using Windows Live Hotmail

See the source image

When you receive an email, you are prepared to react as soon as possible. You may be able to anticipate a response from the original sender right away, thus moving the conversation forward.

It is possible to transfer this instant messaging to Windows Live Hotmail if both of you are signed up for Windows Live Messenger (in a dedicated application, on the web, or inside Windows Live Hotmail).

  • Exchange Instant Messages in Windows Live Hotmail
  • Sign in to Windows Live Messenger using your Windows Live Hotmail account.

Exchange Instant Messages in Windows Live Hotmail

The following are the methods to send an instant message with Windows Live Hotmail:

  • Windows Live Messenger must be enabled in Windows Live Hotmail in order for it to function properly.
  • In Windows Live Hotmail, go to the Contacts tab and choose your contact list.
  • Look for a green light next to the icon representing the sought contact, which indicates that they are available in Windows Live Messenger.

Sending messages while the indicator is illuminated red (busy) or orange (away) is also an option, although the recipient may not be able to respond as quickly as you would want.

  • Instead, send a message by email.
  • Select the contact’s icon from the drop-down menu.
  • Select Send an instant message from the drop-down menu.
  • In the new window that appears, type your message.
  • To send a message, use the Enter key or click the Send button.

To respond to an email with an instant message:

  • In the opened message, select the small green square next to the sender’s name or email address by clicking on it. If the square is colored red or orange, indicating that the sender is busy or unavailable, it is recommended to respond by email.
  • Additionally, unless an instant message is clearly preferable (for example, if you’re trying to pick which movie to see or if you require an urgent response), respond by email.

Sign in to Windows Live Messenger using your Windows Live Hotmail account

Use the following steps to access Windows Live Messenger on the web using your Microsoft Windows Live Hotmail account:

  • In the Windows Live Hotmail toolbar, select Messenger from the list of options.
  • Select Sign in to Messenger from the drop-down menu (Web).

How to Edit a Recipient’s Email Address or Name in Gmail

See the source image

It will be demonstrated in this post how to edit the email address of a recipient when a message is sent. You will also know how to edit email contacts in Gmail. The steps outlined here apply to Gmail’s online interface, which may be accessed with any web browser.

  • Guidelines on changing the recipient on a new email message
  • Change your contact information on your website

Guidelines on changing the recipient on a new email message

Given that the vast majority of people use multiple email addresses (one for business and another for personal use, for example), it is highly likely that Gmail contains duplicate versions of many of your contacts in its database. As a result, when you begin to input the recipient’s name in the To, CC, or BCC box, Gmail may incorrectly auto-populate the To, CC, or BCC field with the erroneous data.

While Gmail makes it straightforward to alter this information directly from the New Message box, other email clients, such as Outlook, do not.

  1. Double-click the recipient for whom you wish to make a change to the address or name in the recipient list.
  2. Make any necessary changes to the recipient’s name or address. In Gmail, as soon as you input a couple of letters in the To, CC, or BCC field, a drop-down menu with matching possibilities appears. Optionally, you can select the proper address from the drop-down selection or continue manually entering the address.
  3. When you’ve completed writing your email, hit the Send button.

How to Change your contact information on your website

You may have entered their information incorrectly in their Gmail contacts if you are attempting to email someone from your contact list and their name or email address does not appear correctly when you try to send them an email. It is possible that altering the contact information will address the problem.

  1. In the upper-right corner, select Contacts from the Google Apps drop-down box.
  2. Hover your cursor over the contact you desire to update. And click the Pencil icon to the right of the contact’s information. The contact’s card is displayed.
  3. Change the user’s name, email address, or any other personal information that has been entered.
  4. To save your changes, click the Save button. In future interactions, the recipient’s name and email address should be accurately shown in the message body.

How to Change the Default Font and Font Size in Outlook

See the source image

You have the ability to change the default font to any font that is installed on your system; the only restriction is that you are limited to the fonts that are installed on your system. So, what are the steps you need to follow in other to accomplish this? We will show you in this piece of article, take a look at the steps below:

  • Change Fonts in Outlook 2019, 2016, 2013, 2010, and Outlook for Microsoft 365
  • Change Fonts in Outlook 2007 and 2003
  • Change the New Message Default Font on Outlook.com

Change Fonts in Outlook 2019, 2016, 2013, 2010, and Outlook for Microsoft 365

Following these steps will allow you to change the default font in Outlook’s desktop version.

  1. From the navigation bar, choose File > Options from the drop-down menu.
  2. Select the Mail category from the navigation bar on the left.
  3. Make your stationery and typefaces more distinctive.
  4. Select Font: from the drop-down menu for each of the parts you wish to change.
  • New mail messages change the default font in emails.
  • Replying or forwarding messages changes the font used whenever you respond or forward an email.
  • Composing and reading plain text messages changes the appearance of plain text messages for you only; plain text messages transmitted to others remain in plain text. • Replying to or forwarding messages changes the font used when responding to or forwarding an email.

If you already have a theme or stationery set up, you may turn it off by clicking Theme and then Disable Theme and Stationery (No Theme).

  1. Choose the font, style, size, color, and effect that you want to use.
  2. Select OK once again to close the Signatures and Stationery window and all of Outlook’s configuration options.

Change Fonts in Outlook 2007 and 2003

Changing the default fonts in Outlook 2007 and 2003 is a process that is quite comparable. The screenshots that follow are for Outlook 2007, and any variations between Outlook 2007 and Outlook 2003 will be indicated in the description.

  1. Options can be found under Tools > Options in the menu bar.
  2. Select the Mail Formats tab from the drop-down menu.
  3. Make your stationery and typefaces more personal.

Users of Outlook 2003 will need to select Fonts from the drop-down menu.

  1. Select your favorite font styles, sizes, and colors from the drop-down menus under New mail messages, Replying or forwarding messages, and Composing and viewing plain text messages, respectively.
  2. Confirm your selection by clicking OK.
  3. After that, press the OK button to close the Options menu.
  4. At this time, the default font features should be permanently changed.

Change the New Message Default Font on Outlook.com

The instructions below will walk you through the process of customizing the fonts used in your outgoing messages in Outlook.com. The default typeface for messages displayed on Microsoft Outlook.com cannot be customized, unlike the program versions of Outlook.

  1. Select Settings > View all Outlook options from the drop-down menu.
  2. Go to Mail > Compose and respond to the message.
  3. Select the font dropdown menu under Message format and then the new default font you want to use from the list that appears. Besides that, you can change the default font size, make text bold, italic, or underlined, as well as change the default font color.
  4. After you’ve made your font selections, click Save when you’re finished.
  5. When creating new messages, Outlook.com will now use the fonts that you have already selected.